Happy New Year!!!

A new year is upon us. What will 2016 bring? Well, my household is in serious need of some healthy eating/ detox. The holidays brought us lots of junk food, too much wine, and lots of eating out. Add in a good dose of sleep deprivation and what’s left is sniffly kids and cranky parents. Hence this weeks menu: Lots of veggies and homemade goodness. After our Saturday wedding we’ll be starting the Whole 30… At least that’s the plan.  

Hope your 2016 is off to a fabulous start! 


Stuffed Acorn Squash


Talk about a perfect fall meal! This stuffed acorn squash was so yummy! And really wasn’t all that difficult. The sweetness of the squash and apples pairs beautifully with savory flavor of the sausage, onions, and celery. The kids weren’t in love with it, but that’s fine! More for me and the hubs!

I got this recipe from a Tasty video I saw on Facebook (check it out here). There was no formal recipe and I had to watch and pause the video a millions times to get all the ingredients correct- kind of a pain. So, I’ll make it easier for you by writing them out. Plus I adjusted the ingredients to make 6 servings instead of 2. You’re welcome.

Stuffed Acorn Squash (makes 6 servings, GF option)

  • 3 Acorn squash
  • 1.5lb Italian sausage (can be pork or turkey)
  • 1 Tbsp oil (plus more for drizzling over squash)
  • 1 Large onion, diced
  • 5 stalks of celery, diced
  • 1 1/2 tsp salt
  • 1 1/2 tsp pepper
  • 1 1/2 tsp rosemary
  • 4 cloves garlic minced
  • 2 apples diced
  • 1 1/2 cups breadcrumbs (I used Glutino GF Breadcrumbs)
  • 1 cup shredded parmesan cheese

Preheat oven to 400 degrees. Wash your acorn squash and cut both top and bottom off of the squash and then cut them in half (here’s where the video comes in handy).  Dig out the seeds and guts. Line a baking sheet with foil and place your squash halves on it with the dug out part up (like a bowl). Drizzle the squash halves with olive oil and sprinkle with salt and pepper. Put those guys in the oven and bake for 40 minutes.

In the meantime, make your stuffing. Heat 1 Tbsp olive oil in a large skillet over medium-high heat. Add your onion, celery, salt, pepper, and rosemary. Let cook till the onion starts to get slightly soft and then add your garlic and continue to cook for another few minutes. Now add your diced apple. Once apple is slightly soft stir in the breadcrumbs and parmesan cheese. Remove from heat and set the stuffing aside until your squash halves are done baking.

Once squash has baked for 40 minutes, remove from the oven and start stuffing them.  You’ll have lots of stuffing so really heap it up and press it in to your squash. Put the stuffed squash back in the oven and bake for 20 minutes. Hope you enjoy this fabulous taste of fall!

Menu Monday

Trying to get back in the habit of writing out my weekly menus. Starting the week off organized just makes me feel good! We are doing some renovations on our new home, so things are out of place and cluttered (which can drive me batty!), but at least I have my menu and grocery list done. A little bit of order in our house of chaos!  

The stuffed acorn squash we had last night was wonderful! I’ll work on getting that recipe up later today. Hope you all have a wonderful week! 


Asian Turkey Meatloaf with Sesame Lime Sauce

This is another family favorite that I haven’t made in awhile. About 15 minutes of prep, an hour in the oven (while I finally got a couple blog posts written) and dinner was done. This meatloaf has great Asian flavor- Especially with a little of the sesame lime sauce. I have also served this meatloaf as meatballs for an easy appetizer. Cooks in half the time and you’ll blow your guests away with a tasty treat they haven’t had before. We did this at Real Food Bliss and it makes a great freezer meal- just make the meatloaf up ahead of time in a loaf pan, stick it in a gallon size freezer bag and freeze it. Thaw it over night in the fridge and bake as a meatloaf or roll it into balls.

I love meatloaves and meatballs because you can really stuff them full of good healthy stuff your kids wouldn’t normally eat on their own. This recipe calls for a large handful of cilantro which is SOOO good for you! Its a great heavy metal detoxifier and its full of nutrients like Vitamins C and K, potassium, folate, and anti-oxidants. Sesame oil is also full of anti-oxidants and has been found to help lower blood pressure when incorporated into your daily diet. What’s not to love??

Asian Turkey Meatloaf with Sesame Lime Sauce

  • 1 1/2 lbs ground Turkey
  • 1/3 cup breadcrumbs (I use Glutino gluten free breadcrumbs)
  • 1 egg
  • 1 Tbsp minced ginger (Don’t even peel it- just grate it with a fine cheese greater. Ain’t nobody got time for that!)
  • 1 clove garlic, minced
  • 1/2 tsp sea salt
  • 1/4-1/2 cup chopped cilantro
  • 3 green onions, chopped
  • 1 Tbsp soy sauce or coconut aminos
  • 2 tsp sesame oil

Preheat oven to 400. Spray a loaf pan with cooking spray. Put all ingredients in a large bowl and mix well with your hands. Place meat mixture into loaf pan and bake for 60 minutes (30 minutes for meatballs on a baking sheet with sides). Now make the sauce.

Sesame Lime Sauce

  • 4 Tbsp soy sauce or coconut aminos
  • 2 tsp sesame oil
  • 2 Tbsp fresh lime juice
  • 2 Tbsp water
  • 1 green onion chopped.

Put all ingredients in a plastic container or small jar with a lid. Shake well to mix. Drizzle over the sliced meatloaf or use as a dipping sauce for meatballs. Goes really good on the rice as well.

Weekly Menu #10

  
Hope you all have enjoyed this summery weather! Here’s this week’s menu. We had the cilantro and lime salmon tonight and loved it! So fresh and summery. Served it with my quick and easy homemade Mac N’ Cheese and dinner was done in less than 20 minutes! 

  
Check out the salmon recipe here: http://www.closetcooking.com/2014/06/cilantro-and-lime-salmon.html?m=1

Mac N’ Cheese Recipe here:  https://girlgonereal.wordpress.com/2015/01/27/booty-cakes-and-mac-n-cheese/

Weekly Menu #7

Week #7.  Wow, the time has flown! Another seven weeks from now and we’ll hopefully be well into spring. Light at the end of the tunnel!

Tonight I experimented with a pork tenderloin marinade and celery root fries. Neither blew me away, but I plan on perfecting those celery root fries! I had to dip mine in ranch to really enjoy them, so thinking of trying a ranch flavoring on them? But we’ll see… Dinner looked pretty though 😊


The Whole Enchilada Casserole

IMG_2391

Mexican food is the bomb. I could literally eat it for every meal. Unless I’m pregnant. But that’s most likely not happening again in this lifetime. So my Mexican food eating days are looking plentiful, God willing. This enchilada casserole has been in the works for awhile. It started out pretty boring with just 4 ingredients- meat, enchilada sauce, tortillas, and cheese. It was good, but boring. Plus I felt like I needed to serve a salad or veggie with it since it didn’t really have any in it. So I decided to put the salad right into the casserole. And I finally achieved Enchilada Casserole perfection! Nutritious? Check. Tasty? Check. Easy? Check.

The Whole Enchilada Casserole (6 servings)

  • 1lb grass-fed ground beef IMG_2394
  • 1 medium onion, diced
  • 1 bell pepper, diced (any color will do)
  • 1 packet Simply Organic taco seasoning (or 2 Tbsp from the bulk section)
  • 6 large organic corn tortillas- my fave —>
  • 1 15oz can black beans, drained and rinsed
  • 1 19oz can enchilada sauce- check out The Environmental Working Group’s Foodscores to see if your store’s brand is any good or make your own with this recipe from Kitchen Meets Girl (this is on my list of things to do)
  • 2 large handfuls of fresh spinach
  • 2 cups shredded Colby jack or Mexican blend cheese
  • Topping suggestions: sour cream (we use plain Greek yogurt- like Fage), avocado, cilantro, jalapenos, green onions, hot sauce

IMG_2399

Preheat oven to 375. In a large skillet brown the ground beef with the onion and bell pepper. Once the meat is brown and the pepper and onion are soft add the black beans and taco seasoning. Mix well. Taste meat and add salt if needed. Turn heat off.


Start layering the casserole. Pour about ¼ cup of the Enchilada sauce over the bottom of a baking dish and spread it around. Place 2 tortillas on the bottom, top with ⅓ of the beef mixture, ⅓ of the remaining sauce and a large handful of spinach. Sprinkle with ⅓ of the cheese and repeat starting with 2 more tortillas, then beef, sauce, spinach, cheese. Repeat on last layer with the remaining ingredients- tortillas, beef, sauce and cheese (no spinach).

IMG_2400

 Place in the preheated oven and bake uncovered for 20-30 minutes, until cheese is melted and bubbly. Serve warm with toppings of your choice.

IMG_2393


Weekly Menu #5

So here it is folks! I feel like this week’s menu is a mix of past weeks meals that I didn’t get around to making for whatever reason. So you might see some repeats on here. Such as the steak we were planning for Valentine’s Day. We ended up getting a last minute babysitter on Friday and enjoyed dinner at Mill Valley Kitchen. So V-day ended up being homemade pizza.
Tonight we had the Enchilada casserole and it was the Bomb! It was my 3rd attempt at perfecting it and I finally nailed it. Can’t wait to share!

IMG_2380

Crock-pot Jamaican Jerk Pork with Grilled Cabbage

We almost ate ourselves into a stupor tonight. The kids did pretty darn good as well. Upon pre-dinner taste test of this Jerk Pork they IMG_2237pretended to faint to the ground moaning “Its so good!” Possibly a slight exaggeration, but truly, I outdid myself tonight. And actually it was pretty darn easy! I marinated the pork a week or two ago when I saw that my Co-op had their pork roasts on sale and froze it. So all I did this morning was dump the frozen roast into my crock-pot and set it to low for 10 hours. Can’t beat that. I do recommend marinating the pork at least the day before so the flavors really have time to take over. The cabbage I served along side the pork was the perfect accompaniment. If you don’t think you like cabbage- you have got to try it grilled. It’ll blow. Your. Mind. And again- even the kids ate theirs with gusto!

Crock-pot Jamaican Jerk Pork (I found the recipe here)- Serves 6-8 people

  • 3-4 lb bone in pork roast (shoulder or butt roast)- The bone gives the meat more moisture and flavor.
  • 6 cloves garlic, minced
  • 3 tablespoons Jerk Seasoning
  • ½ tsp coarse salt
  • 1 lime, squeezed (I actually used the juice of 1 lemon and a couple drops of my Young Living Lime essential oil here since I was out of limes)
  • ½ cup orange juice

Place all ingredients except the pork in a gallon sized ziplock bag. Seal and mix marinade well. Place the pork into the bag, seal and massage the marinade into the meat. Remove as much air as possible and refrigerate over night or freeze if you don’t plan on making it in the next couple days.

To prepare, just put pork and marinade into your crock-pot, cover and cook on low 6-8 hours if meat is thawIMG_2233
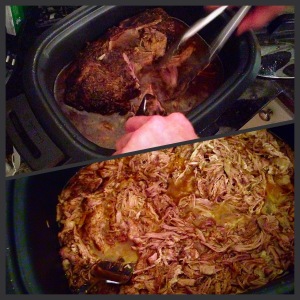
ed or 8-10 hours from frozen. Prior to serving take 2 forks or tongs and a fork (as my husband is doing in the picture) and shred the meat. Discard any fat pieces.

We served ours in gluten-free spinach tortillas with avocado, shredded carrots, spinach, and sliced radishes.

IMG_2225

Grilled Cabbage with Cilantro Lime Dressing (Got the recipe here)- serves 8 as a side dish

  • Juice of 3 Limes (about 1/4 cup)
  • 1/4 cup extra virgin olive oil (plus a little extra for rubbing on the cabbage wedges)
  • 1 tsp fish sauce (optional- but does really add great flavor!)
  • 2 garlic cloves
  • 1/4 c cilantro leaves
  • 1/2 tsp sea salt
  • dash of cayenne pepper (more if you like it spicy)
  • 1/2 tsp honey
  • 1 head green cabbage

Put all ingredients except cabbage in a blender and mix until smooth. Dressing will be a bit on the watery side. I like to pour mine into a small glass jar with a lid so its easier to shake and store later in the fridge.

Now preheat a grill or grill pan over medium heat. Remove the loosest, toughest outer leaves from the cabbage, and cut into 8 evenly-sized wedges. Do not remove the stalk or inner core. Lightly rub the wedges with olive oil on either side and sprinkle with a little salt. Place the wedges on the grill/pan and cook for 5-7 minutes. Flip, and cook the other side another 5-7 minutes.

IMG_2234

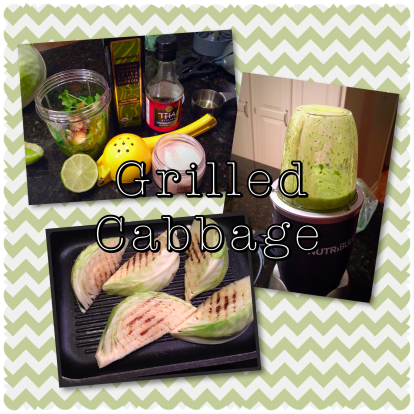
The cilantro lime dressing is so good you’ll want to lick your plate! This meal reminds me of summer and reassures me that winter won’t be here forever. Enjoy!


Philly Steak & Cheese Stuffed Peppers

IMG_2208

A good Philly Steak and Cheese Sandwich is definitely on my list of favorite foods. Steak? Good. Peppers? Good. Cheese? Good. What’s not to like? But being gluten free has made eating sandwiches a little less appealing. This recipe is a great alternative to all that bread. And I find it just as satisfying! My kids even ate them! I added carrots and spinach to the mix because I’m always trying to add more veggies.

Philly Steak & Cheese Stuffed Peppers- makes 8 servings

  • 4 bell peppers, halved and seeds removed
  • 1 lb thin sliced roast beef deli meat
  • 16 slices of cheese- provolone, Havarti, or muenster work well
  • 1 large onion sliced into strips
  • 1 clove garlic, minced
  • 1 Tbsp olive oil
  • 3 carrots peeled and cut into thin slices
  • 2 handfuls fresh spinach
  • 6oz baby portabella (crimini) or white mushrooms, sliced (I forgot to buy these at the store today so they didn’t make it into the pictures- but they really do make the meal!)
  • Salt and pepper to taste

Preheat oven to 375. In a large skillet heat the olive oil over medium heat. AddIMG_2207 the onion and cook for about 2-3 minutes. Add the carrots and garlic and continue to cook stirring frequently for another 5 minutes. Add the mushrooms and cook until mushrooms and carrots are soft- another 5-8 minutes or so. Now add a couple handfuls of spinach, the sliced roast beef, and salt and pepper. Stir well and heat until spinach is just wilted. Remove from heat.

IMG_2209
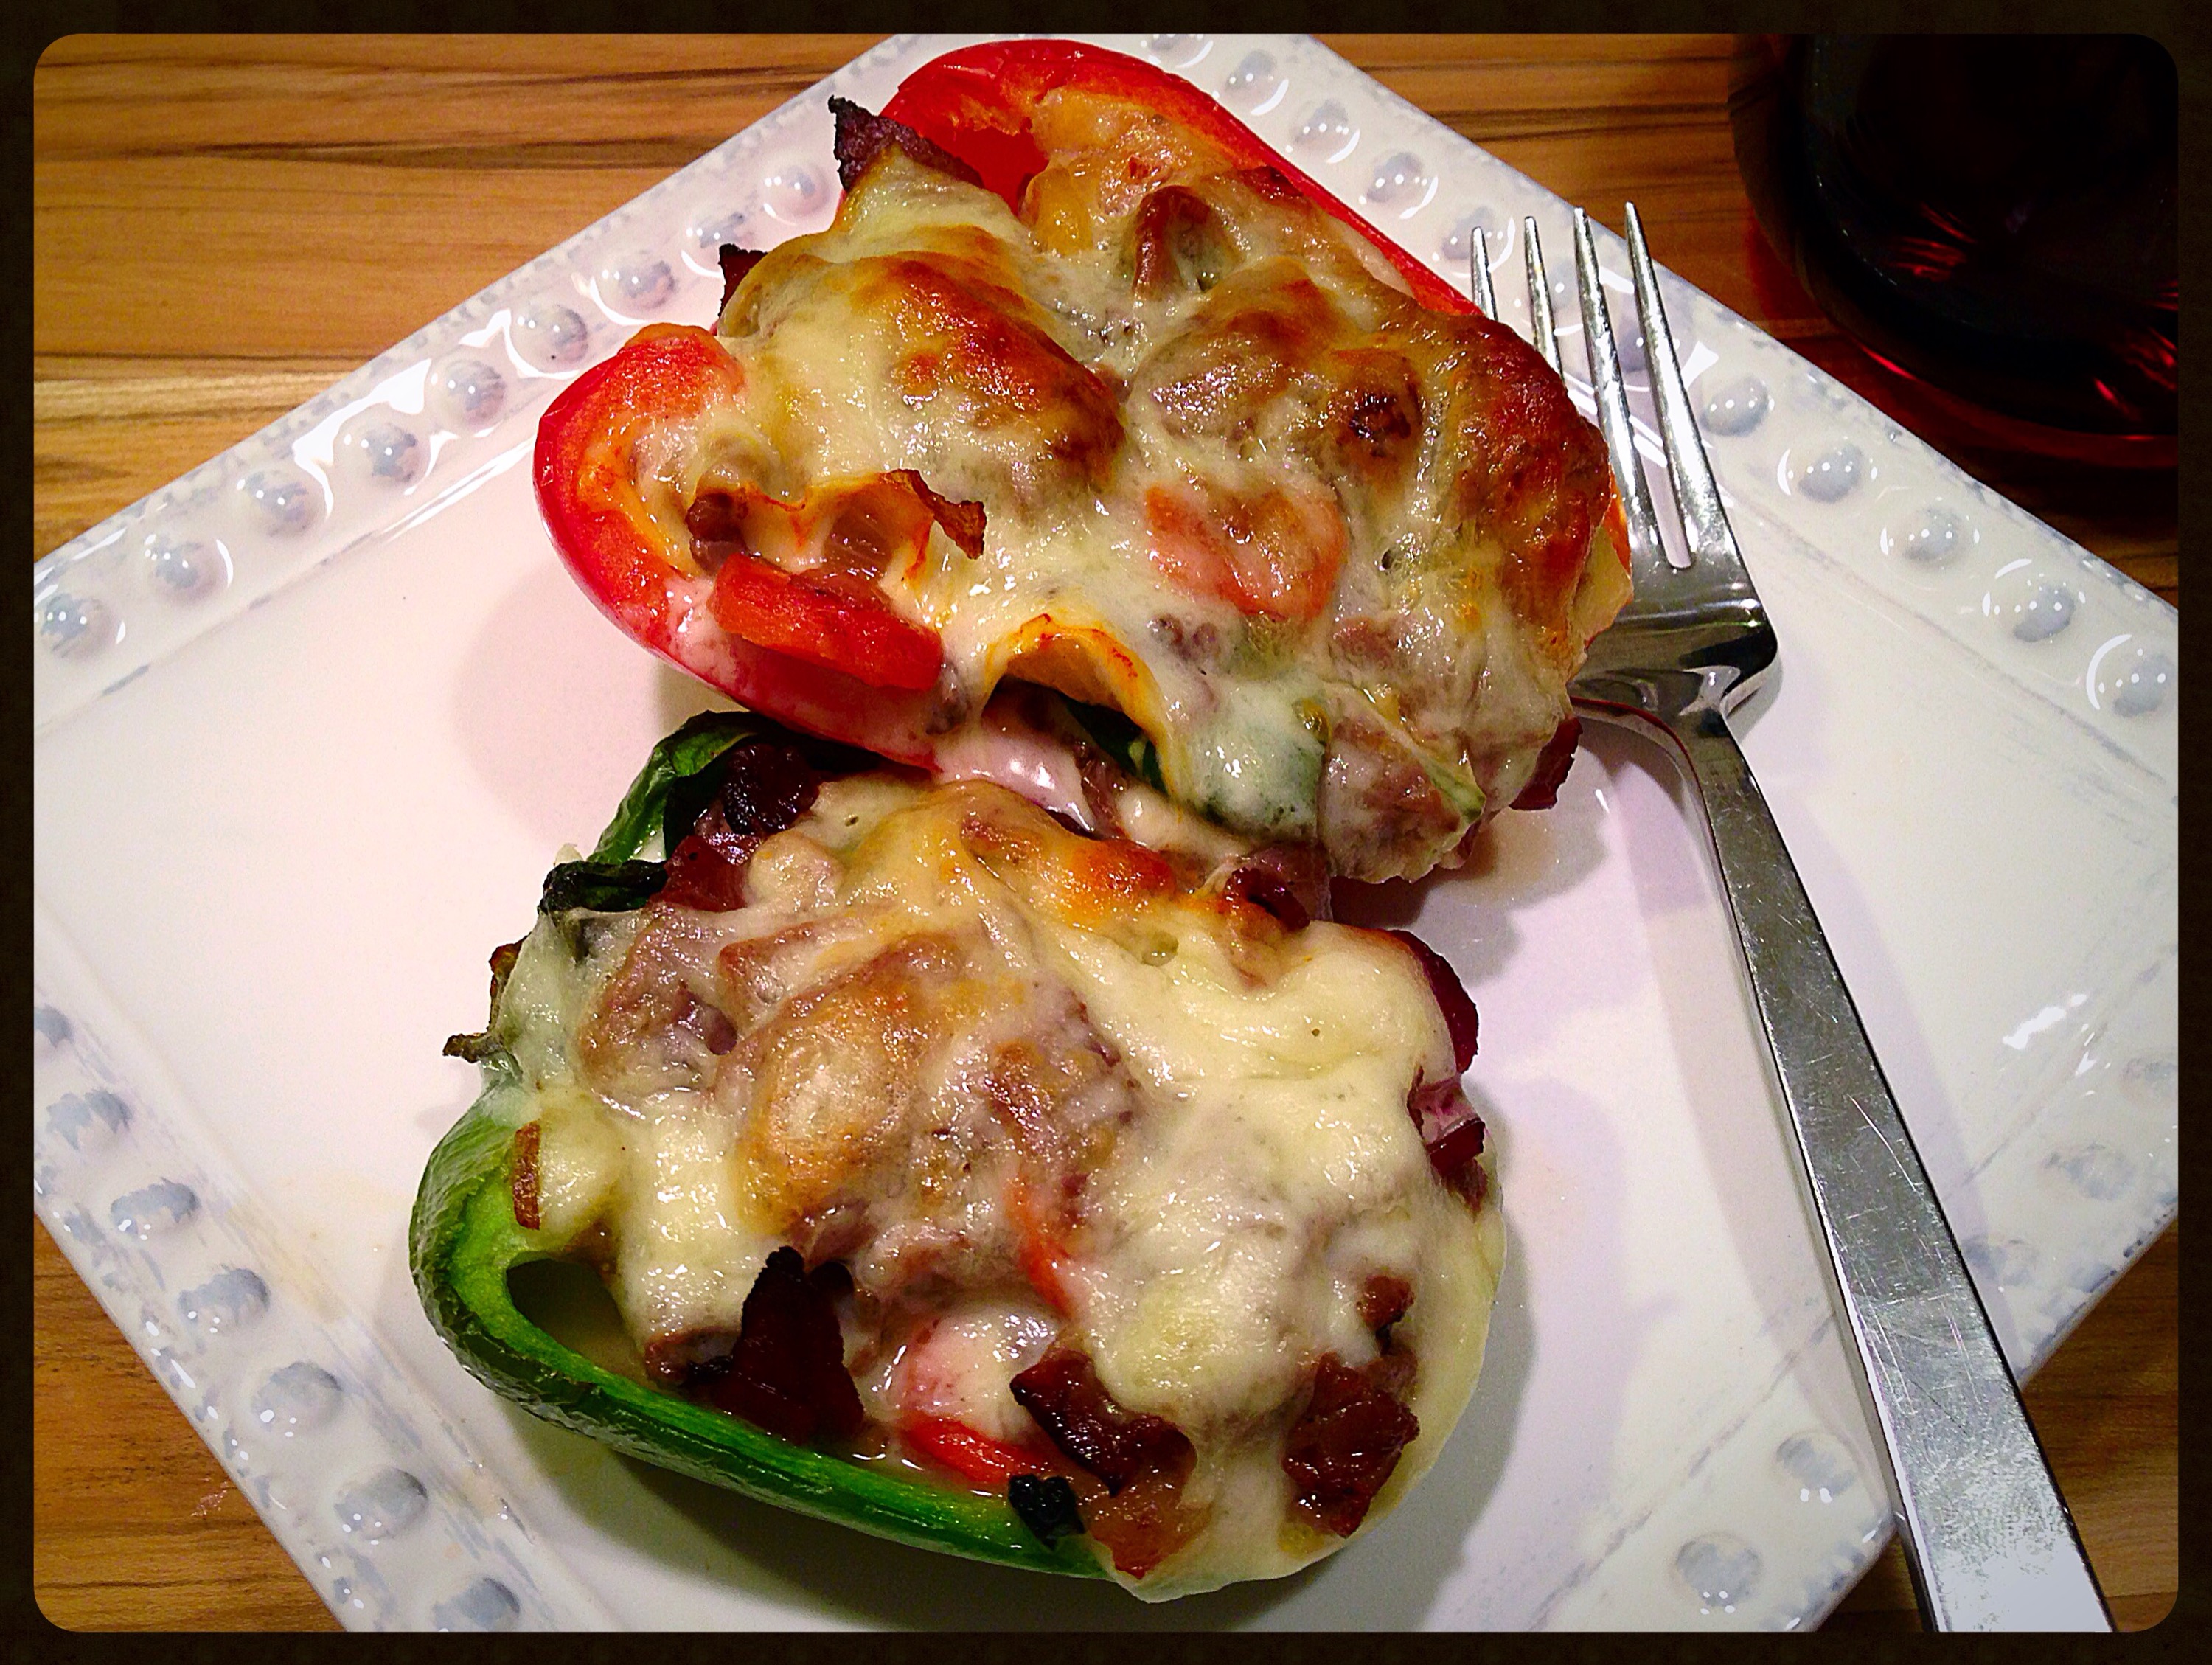
Place your pepper halves on a foil lined cookie sheet and line each pepper with a slice of cheese. You might not need the whole slice depending on the size of your peppers. Fill each pepper with your roast beef/ veggie mixture, stuffing as much as you can into each pepper without breaking it. Cover the stuffing with another slice of cheese and place in oven. Bake for 25-30 minutes until peppers are soft and cheese is bubbly and slightly browned. I just ended up picking mine up and eating it like a large taco. I added some pickled jalapenos to spice it up a bit. Devine! Looking forward to the leftovers.